Intentions and Techniques

In twenty-four years of teaching intro to analog photography at Muhlenberg College in Allentown, Pennsylvania my students and I have never been without the darkroom.  Fortunately they were able to leave campus with cameras in hand and the knowledge to use them.  I’m looking forward to the results when I process and proof their film.

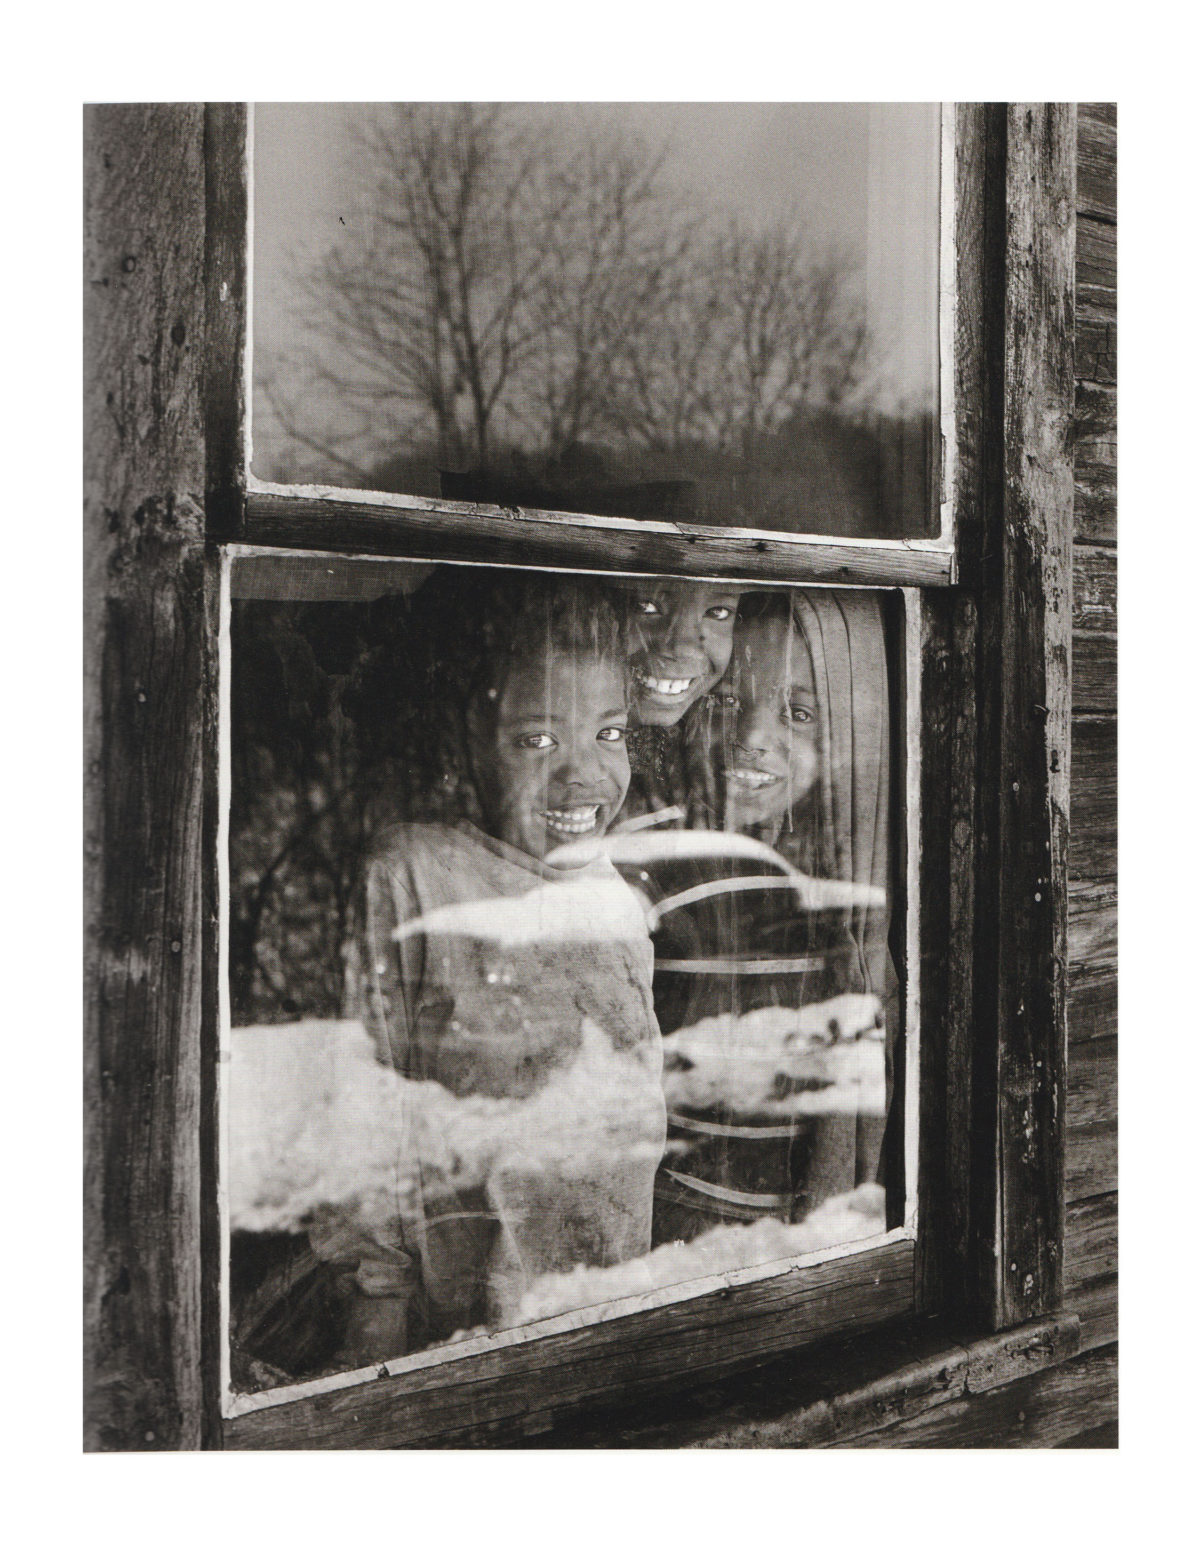
Lacking the ability to critique their personal images on a class-by-class basis, and having to wait for the results is a challenge.  To keep them engaged and thinking I’ve been emailing a jpg or two of an image for them to write about; what do they see, how does it make them feel and why. Builder Levy’s photograph Osage Window, Scotts Run, Monongalia County, West Virginia, 1970 shown here is an example.  I’ve included a student’s response and his request.

“For this photography, in my understanding, photographer wants to depict a contrast between the reflection of the outside world and the three children’s smiling faces inside. And through the window, our sight can be limited by the frame and feel the contrast between inside and outside world. 

And if it’s possible, may I ask you to write your understanding of this photography. I just want to learn how to analyze a photograph like a professional.

My answer: The success of this photograph revolves around three beautiful pair of eyes and teeth.  The children and photographer did their jobs at just the right moment together.  But lets explore the different layers of the photograph beyond the smiles to see why it works.

First, the reflections because they seem to function on three separate levels or layers.  The glass creates the reflection but also allows us to see through and is a physical presence as well. The reflections provide clues to the surroundings but do not compete with what is inside because they are out of focus. The out of focus landscape alludes to a place and time for everyone.  The glass divides how we perceive the space inside and out but puts the distance between on an equal two-dimensional plane because that’s how photography works.  I think the tree branches make the kids look like Wilson the soccer ball from the movie Castaway, and the snow like Cheshire cats from Alice in Wonderland, for example.

The frame is as important as the subject, it defines limits and sets the stage, directs attention.  This photograph has more than one frame going for it.  The borders of the photograph are the first, the window is the second, but with two sash frames that makes three.  And then there is the framing of the house that holds the window in place, number four.  The point being that all parts of the whole work together to complete the experience.  Sometimes the frame can hold an attraction right up to the very edge but still keep you in.  Here they work together, with subtle details, to bring you back to the eyes and teeth.  Frame number five, maybe the most important, is the bright high contrast painted window trim that lights up like neon around the three smiles.  The actual print was gold toned to add warmth and richness, deepen the blacks and enhances the contrast.

When I was eight and lived at 411 North 23rd Street, just off the east side of campus, our neighbors at 413 included three girls around the same age as me.  Photographs can mean many things to many people.  Unlike putting pencil to paper, with film sometimes you only get a fraction of a second to record a universal experience.

I would hang this one in my kitchen next to the backdoor.

David Haas

So, You Want To Be A Writer?

Listening to a podcast the other day the host, who had apparently been asked by a listener for advice on “how to become a writer”, gave an answer first saying -and I’m paraphrasing this – “First we must ask ourselves a few other questions before we can answer that one.”

“Do you read a lot?  Do you read what you write?  Do you read what other people have written?”

This made me ask myself whether these questions can be applied to being a photographer?

Do you look at a lot of photographs?  Do you look at your own photographs?  Do you look at other people’s photographs?

These are fine questions; we all seem to be out making lots of exposures.  Some of my digital friends brag about making thousands of exposures in a day!  I’ve always had a hard time editing the few hundred exposures I make a year.

I would contend that with a thousand exposures a day there is no way to look at – and I mean really look at – all of them.  We see lots of imagery, it’s all around us, but do we really look at it?  One might argue successfully that maybe most of it is not really worth looking at, which is beside the point.

I looked up what the average time a person spends in front of a piece of art work at a museum.  According to Google, a study done in 2001 found that the average time was seventeen seconds.  Seventeen seconds!  And most of that time the person spent reading the writing on the wall next to the piece of art work.  I can only imagine what the average time someone spends swiping with their thumbs while diddling on their phones looking at digital imagery.

Here is an exercise I recommend; get a pile of your prints and an easel.  Set the easel in a well-lit area; pull up a stool and a beverage of choice.  Then put a print on the easel and start the timer on your phone for two minutes and look at each of your images for the duration of the time.  When the time is up, place the next image on the easel, hit the timer and start again.

Doing this for the first time was an eye opener for me, even though I’d spent hours looking at the image, while composing, exposing, processing, printing and mounting.  It seems once completed prints become invisible and there is so much that we can learn from carefully reading our own work.  Is the composition the best we could have done?  What about the lighting? What about the tones and values in the print?  Does the image still sing to you like it did the day you exposed it, or if you’re honest with yourself, is it a boring print, even if it was well made.  Only by sitting down with your work can you tell if you are speaking the truth with your prints.

After all, as visual artists how can we possibly expect others to spend more than a few seconds looking at our images if we ourselves can’t even look at our own work?

The host of the podcast argued that if we don’t read a lot, read our own work, and read the work of others, then we are not a writer but rather someone who likes to write.  A writer is someone who is reading a lot, reading what others are saying and wants to write to contribute to the conversation of the other writers.

So, are you a photographer?

James A. Kipfer

UV Light Box for Albumen Printing

When acquiring my 8×10 View Camera a few years ago I did so with the intention to make contact prints using modern and, down the road, historical processes.

At the time I did not know much about the techniques and materials of historical processes but I loved the tonality and detail of the prints that I had seen in exhibitions and books. After thoroughly researching, I found the connection to historical processes , particularly Albumen Printing, quite fascinating.

Historically, most Albumen prints have been made from dry and wet glass plate negatives. Since I had never made dry or wet glass plate negatives, my initial plan was to make Albumen contact prints from the same film negatives that I would be using for silver chloride contact prints.

Since Albumen coated and silver sensitized printing paper is no longer commercially available it must be hand-made using artists’ paper which is then coated with Albumen and light sensitive silver nitrate using historical or modern recipes. (Albumen paper coating and sensitizing is an exhaustive subject by itself and will be covered in a future entry.)

From the beginning of photography the sun has been the source of light to enable a negative to be printed as a positive. The UV and blue wavelengths in sunlight were essential to printing glass negatives on Albumen paper.

Although I truly enjoyed using the sun as my light source and making this connection to the photographers from the 1850 – 1900 period, the inconsistent and unpredictable nature of the sun was a challenge to me. Printing only on sunny days, at specific times during the day (11AM – 1PM = best UV light), and with light levels changing from season to season, was technically challenging. Additionally, I like to work in the darkroom at night which was not possible!

I researched the internet for photography web sites, forums, and videos to learn about light boxes for historical printing processes and found a wealth of information for purchasing commercially available “off the shelf” light boxes as well as descriptions of and plans for DIY light boxes.

Research showed that specific wavelengths of light were required for different historical printing processes as the light sensitivity of the various chemicals utilized were different.

  • I decided that a DIY light box would be the best fit for me. The options were many:
    • Fluorescent Tubes: BL, BLB, and SA
    • H.I.D.: Mercury Vapor, Metal Halide
    • LED
    • Tanning Lights / Tanning Beds
    • UV Grow Lights
    • Reptile Aquarium Lights

After a lot of reading and interaction with web and Forum members who had already built their own light boxes, I decided to build a UV Printer using BLB fluorescent bulbs. I chose BLB bulbs because I did not want LED/ Tanning/Grow/Aquarium bulbs and BLB bulbs were lower cost than BL bulbs.

  • Below are a few details of my build:
    • Overall Size: 28in.W x 25in.D x 18in.H
    • Bulb Specs: Twelve 15W T8 BLB tubes 18in.L x 1in.W
    • Cooling: Two “computer” fans
    • Reflective interior walls: Silver foil tape
    • Accepts my 11×14 contact printing frames with room to spare
    • Average print time with the box: 10-18 minutes
    • Average print time with the sun: 6-12 minutes

Stay in touch for my next blog ……. DIY modification of a standard film holder for use with dry & wet glass plates.

Drew Wagner

The State of our Supply

Things really are not so bad when it comes to black white film, paper and chemistry for silver gelatin work. Same goes for the chemistry and papers to make alternative emulsion processes.  Despite what some would have the uninformed think, film is not dead and traditional wet-based prints made from film are also alive and well.  There certainly was a time when the analog world was starting to look a little bleak, but that’s no longer the case!

Certainly if you are a fan of Kodak products there fewer films available and paper is no longer being produced, but Tri-X, for example, still lives on in its latest formulation along with D76 and HC-110 to develop it!  Ilford is still going strong; recently they introduced a range of new papers to update their VC line that compliments their beautiful Gallerie graded paper, and their films are still widely available. While the pickings might be slim in your local brick and mortar camera shop, Freestyle Photo, B&H and Adorama to name a few, have thriving storefronts and online sites so you can get whatever you need.

Checking out the Freestyle’s site I see listings for 26 brands of black and white film and 7 brands of paper available. In the case of film, there are a variety of choices up to 8×10. Less for 11X14, and beyond that you are talking about special orders to the majors, most likely for group purchases. But, Fuji Acros is back from the dead in the form of Acros II, available in 35mm and 120 formats.  Fuji originally discontinued Acros due to decreasing demand but according to the company “ due to recent interest from millennials and GenZs, who have become the newest film enthusiasts, Fujifilm developed a plan to revive black-and-white film to meet new market demands”.  Just like vinyl records, film will just not go away, due in part to resurgence of interest from younger generations.

When it comes to alternative processes, one only needs to visit the websites of Bostick & Sullivan, Artcraft and Photographer’s Formulary to stock up.  All three provide raw chemical components for those that like to mix their own, as well as premade products, including their own proprietary formulas.

Hey, even instant film is back along with the cameras to use it! 35mm, medium format and large format cameras are still being made and there’s a ton of high quality used gear out there that will work flawlessly for years to come. Enlargers are still being manufactured too and Jobo is producing their wonderful film processors again.  And more good news – used darkroom equipment still can easily be found at great prices.

Yes, film and paper costs have risen and we don’t have all the choices we once had. On the other hand we have some wonderful new film, paper and chemistry choices that were not available in the “good old days”!

All things considered, I would say the state of things is fine and life is pretty good!

Michael Marks

Welcome to Monalog™

After I attended the last year’s Photo Arts Xchange organized by Steve Sherman and a number of other fine black and white photographers, I started to think about what I could do to further support a vibrant black and white analog photography community. I already had my own website that focuses on my love of black and white film photography and the darkroom, but I wanted to do more, and I sensed that there would be others that shared my passion and felt the same way.

At the Photo Arts Xchange I met a number of outstanding photographers that worked exclusively with black and white film and used only traditional wet processes to realize their exceptional vision. I decided to reach out to them and other like minded photographers I knew that I thought would be receptive to the idea of creating a photographer’s collective who’s sole mission would be to “support black and white film photography and traditional printing processes”.

The founders of this collective make silver gelatin enlargements, contact prints on Lodima and Azo paper, platimum and albumen prints and prints using carbon transfer processes. They use 35mm and medium format rangefinders, medium format SLRs, and a range of wooden view cameras that produce images using 4×5, 8×10, 11×14, 8×20 or 14×17 inch negatives. We all used different tools, films, chemistry and papers to create our art, but we share a love and unabiding commitment to black and white film and traditional printing processes.

We have chosen to call our collective Monalog™, a new word derived from “monochrome” and “analog”. We chose this because we don’t make color prints or incorporate anything digital in what we do … no scanning of negatives, no creation of “negatives” from digital files, and no digital printing of film negatives. This having been said, our objective is not to make judgments about color or digital, but support what we use and care deeply about.

Monalog™ was formed by six founding members: Mel Evans, Jim Fitzgerald, David Haas, Jim Kipfer, Michael Marks and Drew Wagner. Our goal is to grow through membership of fellow “monalog™” photographers that are dedicated to this wonderful medium and exhibit a high caliber of vision and adherence to their craft. We will also engage with others, individually and through collaborative activity, and support the industry that makes all this possible.

As best as I can tell, there is no other collective like Monalog™. I hope you will join us on this exciting journey!

Michael Marks
Doylestown, Pennsylvania
March 9, 2020